Schemas for structured data processing
Learn how to process documents and extract structured data using TrustGraph’s schema-based extraction capabilities.
This feature was introduced in TrustGraph 1.2.
Overview
TrustGraph provides capabilities for extracting structured information from documents using configurable schemas. This allows you to define custom data structures and have TrustGraph automatically extract matching information from your documents.
Note: TrustGraph 1.3 introduces fully integrated query capabilities for structured data. You can now query extracted data using natural language, GraphQL, or direct object queries through the CLI commands.
This guide walks through defining extraction schemas, loading structured data, processing documents, and querying the extracted data using TrustGraph’s integrated query tools.
What You’ll Learn
- How to define a custom extraction schema
- How to load structured data directly using
tg-load-structured-data - How to load test documents into TrustGraph
- How to start an object extraction flow
- How to process documents through the extraction pipeline
- How to query extracted data using natural language, GraphQL, and object queries
Prerequisites
Before starting this guide, ensure you have:
- A running TrustGraph instance version 1.3 or later (see Installation Guide)
- Python 3.11 or later with the TrustGraph CLI tools installed (
pip install trustgraph-cli) - Sample documents or structured data files to process
Defining a Schema
The first step is to define a schema that describes the structured data you want to extract from documents. The schema defines the types of objects and their properties that TrustGraph should look for.
You can create a schema using either the web workbench or the command line interface.
Option A: Using the Web Workbench
-
Access the TrustGraph Workbench Navigate to http://localhost:8888/ in your web browser.
- Enable Schema Feature Before you can access schemas, ensure the feature is enabled:
- Go to Settings in the navigation menu
- Find the Schemas option and make sure it is checked/enabled
- Save settings if needed
-
Open Schema Configuration Once schemas are enabled, click on the “Schema” tab in the navigation menu.
-
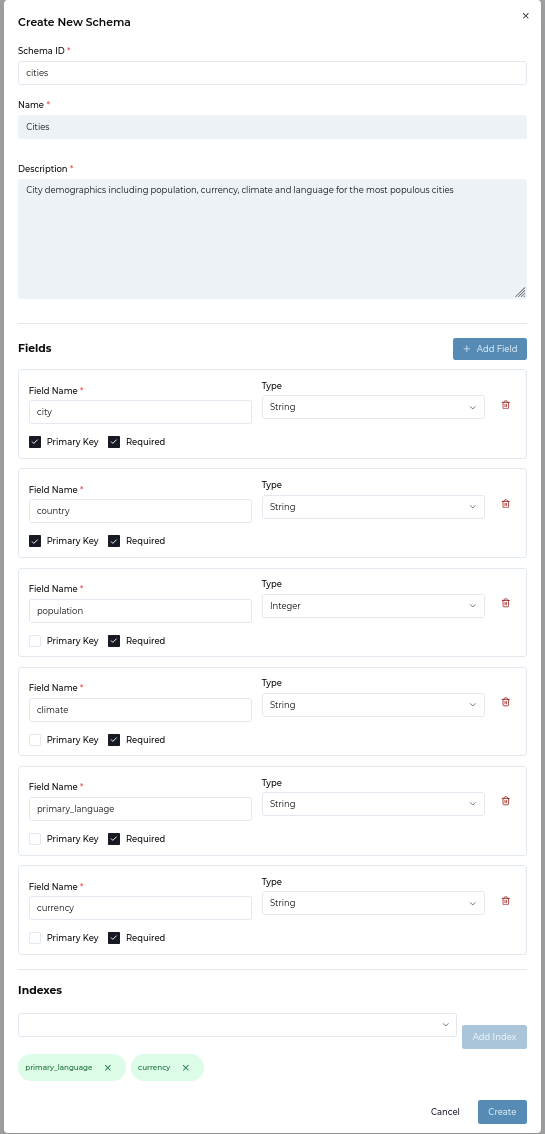
Create a New Schema Click the “Create New Schema” button to open the schema creation dialog.
- Configure Basic Schema Information
- Schema ID: Enter a unique identifier (e.g.,
cities) - Name: Enter a display name (e.g.,
Cities) - Description: Add a description of what data this schema captures (e.g.,
City demographics including population, currency, climate and language for the most populous cities)
- Schema ID: Enter a unique identifier (e.g.,
-
Add Schema Fields Click “Add Field” for each field you want to include. For our cities example:
Field 1 - City Name:
- Field Name:
city - Type:
String - ☑ Primary Key
- ☑ Required
Field 2 - Country:
- Field Name:
country - Type:
String - ☑ Primary Key
- ☑ Required
Field 3 - Population:
- Field Name:
population - Type:
Integer - ☐ Primary Key
- ☑ Required
Field 4 - Climate:
- Field Name:
climate - Type:
String - ☐ Primary Key
- ☑ Required
Field 5 - Primary Language:
- Field Name:
primary_language - Type:
String - ☐ Primary Key
- ☑ Required
Field 6 - Currency:
- Field Name:
currency - Type:
String - ☐ Primary Key
- ☑ Required
- Field Name:
- Configure Indexes In the Indexes section, click “Add Index” and add:
primary_languagecurrency
Note: Structured data does not support extra index fields at the moment.
- Save the Schema Click “Create” to save your schema.
Option B: Using the Command Line
You can also create a schema using the CLI with the tg-put-config command:
tg-put-config-item --type schema --key cities --value '{
  "name": "Cities",
  "description": "City demographics including population, currency, climate and language for the most populous cities",
  "fields": [
    {
      "id": "278f1d70-5000-42ae-b9d5-dea78d0d01a9",
      "name": "city",
      "type": "string",
      "primary_key": true,
      "required": true
    },
    {
      "id": "83b7d911-b086-4614-b44c-74d20d8e8ba8",
      "name": "country",
      "type": "string",
      "primary_key": true,
      "required": true
    },
    {
      "id": "00b09134-34ec-46be-a374-4ba2e3cb95e2",
      "name": "population",
      "type": "integer",
      "primary_key": false,
      "required": true
    },
    {
      "id": "18e434ae-3dbb-4431-a8b5-15a744ad23b2",
      "name": "climate",
      "type": "string",
      "primary_key": false,
      "required": true
    },
    {
      "id": "e4e8ff1f-7605-4a49-aebc-3538d15f52ff",
      "name": "primary_language",
      "type": "string",
      "primary_key": false,
      "required": true
    },
    {
      "id": "2d661b00-d3e2-4d6b-b283-8c65220b8d59",
      "name": "currency",
      "type": "string",
      "primary_key": false,
      "required": true
    }
  ],
  "indexes": ["primary_language", "currency"]
}'
Verify Schema Creation
Regardless of which method you used, verify the schema was created:
# List all schemas
tg-list-config-items --type schema

# View specific schema details
tg-get-config-item --type schema --key cities
You should see your cities schema with all defined fields and indexes.
Best Practices
Schema Design
- Keep schemas focused on specific domains
- Use clear, descriptive property names
- Include helpful descriptions for each property
- Start simple and iterate
Further Reading
- tg-put-config-item - Write a configuration item
- tg-get-config-item - Fetch a configuration item
- tg-list-config-items - List configuration items
- TrustGraph CLI Reference - Complete CLI documentation